
Basket-Within-a-Basket
Jump to Information About This Basket

Golden Age Forge
"The
Gallery"
Basket-Within-a-Basket
Jump to Information About This Basket
![]() I
have gone into considerable detail about the techniques used for making
some of the pieces shown below. I have done this so a person looking for
ideas to try in his own shop will have a little additional information
that may be helpful. The casual reader may find some of the additional
information of interest too. Enjoy!
I
have gone into considerable detail about the techniques used for making
some of the pieces shown below. I have done this so a person looking for
ideas to try in his own shop will have a little additional information
that may be helpful. The casual reader may find some of the additional
information of interest too. Enjoy!
The Full Site
Map - Lists All Pages on My Site
Some of My Work
![]() Here are a few pieces of my work. Click the links, or linked image, for
full sized pictures of most of the following pieces.
Here are a few pieces of my work. Click the links, or linked image, for
full sized pictures of most of the following pieces.
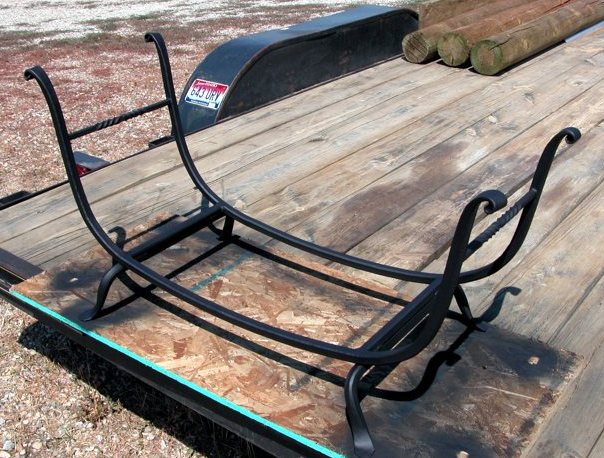
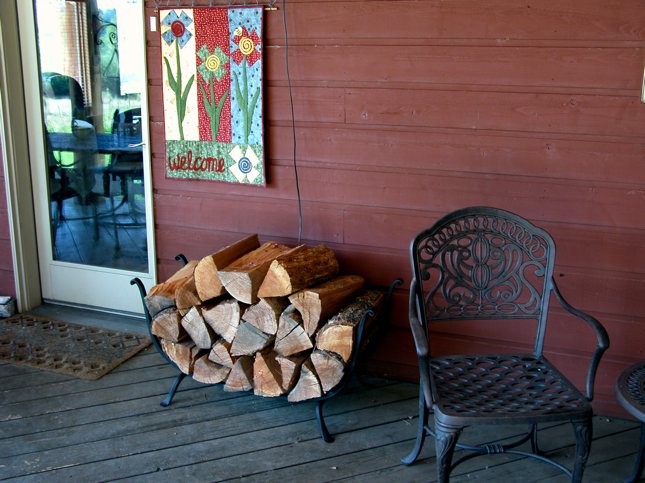
Firewood Storage Rack
![]() We
had need of a wood storage rack for our porch, but I have been far
too busy to take a little time and forge the needed rack. It is all
made from 1" square solid steel stock, except the two double reverse
twisted end bars, which are 1/2" stock. I was pleased with how it
turned out because I have not had time to forge any decorative
ironwork for the three years since we moved to the ranch. The
forming work was initially done cold on my P-6 fly-press, but a
mistake in my bending index marks caused me to have to switch to hot
forming on the Acorn table. All the stock was first edge broken and
worked to give it a nice patina, then it was drawn, formed, and
welded together.
We
had need of a wood storage rack for our porch, but I have been far
too busy to take a little time and forge the needed rack. It is all
made from 1" square solid steel stock, except the two double reverse
twisted end bars, which are 1/2" stock. I was pleased with how it
turned out because I have not had time to forge any decorative
ironwork for the three years since we moved to the ranch. The
forming work was initially done cold on my P-6 fly-press, but a
mistake in my bending index marks caused me to have to switch to hot
forming on the Acorn table. All the stock was first edge broken and
worked to give it a nice patina, then it was drawn, formed, and
welded together.
![]() Because
the
rack was going to be painted, which I rarely do to my ironwork, I
decided to braze the two end bars into place. Since I didn't have a
formal plan when I started this project, just started forming it by
eye to match a rough mental image, I didn't know it would have the
two twisted end braces. If I had known, I would have used tennon
joints instead of the brazed connections. I prefer brazed joints to
welds if it will be covered with paint because the braze, if done
correctly, results in a very smooth finished joint with nice
filleted edges, compared to the rough ugly joint typical of a weld.
Because
the
rack was going to be painted, which I rarely do to my ironwork, I
decided to braze the two end bars into place. Since I didn't have a
formal plan when I started this project, just started forming it by
eye to match a rough mental image, I didn't know it would have the
two twisted end braces. If I had known, I would have used tennon
joints instead of the brazed connections. I prefer brazed joints to
welds if it will be covered with paint because the braze, if done
correctly, results in a very smooth finished joint with nice
filleted edges, compared to the rough ugly joint typical of a weld.
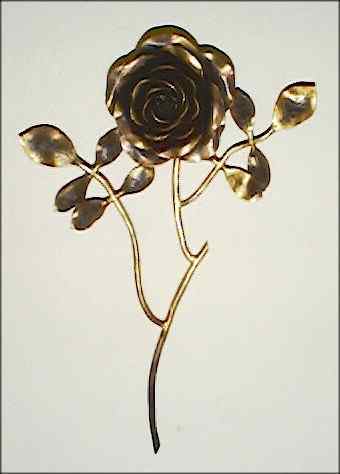
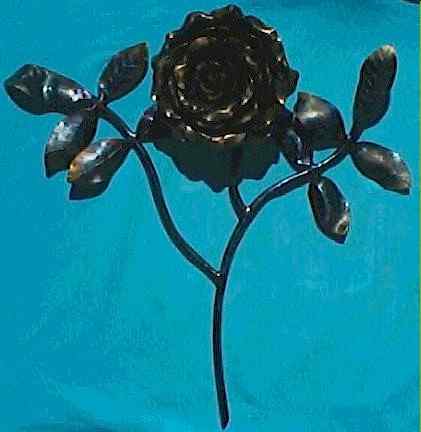
Hot Forged Leaves and Iron Roses
They have uses too...an iron rose
and
another iron rose
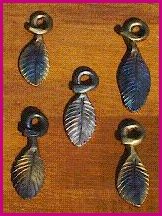
![]() Forged
leaves are used on a great variety of ironwork. In the example pictured
above, these simple leaves were used as key chain pendants for gifts to
friends and family. The roses linked below the image are time consuming
to make, but the result is worth it. I have made quite a few of these,
including one very special piece that was presented to a beautiful young
bride during her wedding in the "Rose Garden" in Boise, Idaho. That
piece took me three months to make in my spare time. I wish I had an
image of it to include here.
Forged
leaves are used on a great variety of ironwork. In the example pictured
above, these simple leaves were used as key chain pendants for gifts to
friends and family. The roses linked below the image are time consuming
to make, but the result is worth it. I have made quite a few of these,
including one very special piece that was presented to a beautiful young
bride during her wedding in the "Rose Garden" in Boise, Idaho. That
piece took me three months to make in my spare time. I wish I had an
image of it to include here.
![]() Making
a "basket-within-a-basket" is most definitely not a beginner's project.
I will not go into detail as to how I made it, assuming that anyone who
gets to the point where they wish to make one of these will already have
mastered the basics. I will only relate a few of the finer points that a
more advanced smith might be interested in. If you decide you want to
make one, become skilled in making single baskets first. The inner
basket inside the basket shown at the top of this page has six 1/4" rods
surrounding a short core rod on each end. The outer basket is formed of
eleven 1/4" rods, for a total of eighteen 1/4" rods in the whole piece.
The innermost "core" rod was cut into 1" long segments prior to doing
the forge welds on each end so that all but the end segments would drop
out of the center portion when the basket was opened out during the
untwisting. The overall piece is 9" long and a little over 3" in
diameter. The critical skills to master before attempting one of these
are maintaining axial alignment of the piece, and also how to get it to
open symmetrically to the diameter desired, both internally and
externally. It should also be understood that competence in
forge-welding is necessary. The basket shown is just a prototype
element, and will not be used for anything other than a shop shelf
conversation piece. I wanted to do this one for practice before I begin
using these for elements in more complex pieces. If this basket were to
be used in a larger piece of work, the rough ends with their parallel
forge-weld lines would be forged down to the diameter of the piece it
joins to. In the process the lines and roughness would be removed and it
would be more graceful. You can plan on spending at least a day to make
one of these, and some additional time for clean-up and finishing.
Making
a "basket-within-a-basket" is most definitely not a beginner's project.
I will not go into detail as to how I made it, assuming that anyone who
gets to the point where they wish to make one of these will already have
mastered the basics. I will only relate a few of the finer points that a
more advanced smith might be interested in. If you decide you want to
make one, become skilled in making single baskets first. The inner
basket inside the basket shown at the top of this page has six 1/4" rods
surrounding a short core rod on each end. The outer basket is formed of
eleven 1/4" rods, for a total of eighteen 1/4" rods in the whole piece.
The innermost "core" rod was cut into 1" long segments prior to doing
the forge welds on each end so that all but the end segments would drop
out of the center portion when the basket was opened out during the
untwisting. The overall piece is 9" long and a little over 3" in
diameter. The critical skills to master before attempting one of these
are maintaining axial alignment of the piece, and also how to get it to
open symmetrically to the diameter desired, both internally and
externally. It should also be understood that competence in
forge-welding is necessary. The basket shown is just a prototype
element, and will not be used for anything other than a shop shelf
conversation piece. I wanted to do this one for practice before I begin
using these for elements in more complex pieces. If this basket were to
be used in a larger piece of work, the rough ends with their parallel
forge-weld lines would be forged down to the diameter of the piece it
joins to. In the process the lines and roughness would be removed and it
would be more graceful. You can plan on spending at least a day to make
one of these, and some additional time for clean-up and finishing.
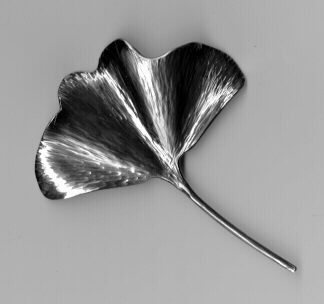
Click here, or on leaf, for full size image
of this Steel Ginkgo leaf.
Another Steel Ginkgo Leaf with Natural
Pattern
Brass & Steel Ginkgo Leaves
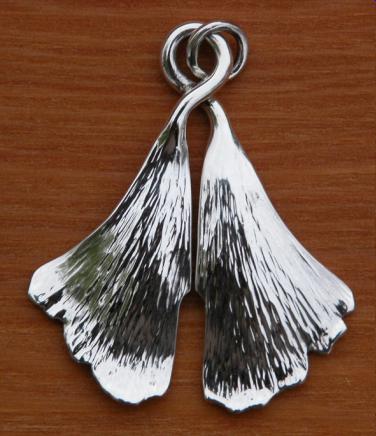
Sterling Silver Repousse' Ginkgo Pendant
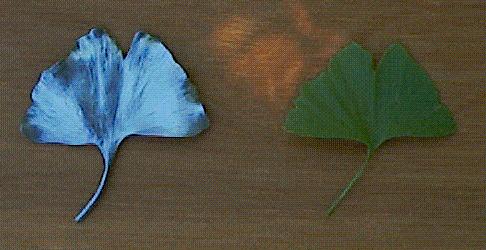
Note: The image of the
Sterling silver Ginkgo pendant is very poor, making the front side
look flat with a flat bend at the bottom. It is not flat, and by
looking at the image on the right side you can see the depth and
contour of its form. These pictures were taken prior to the final
buffing, so its still rough in places, especially the wrapped around
stem. It is a far finer piece than the picture would indicate. Working
the 18 gage silver was very different from other metals due to its
softness, which made the preservation of the patina on the back side
more difficult when I worked the front. When it was completed,
including the final buffing, its brilliance was beautiful, and it
would have been very hard to take a picture of. This pendant was done
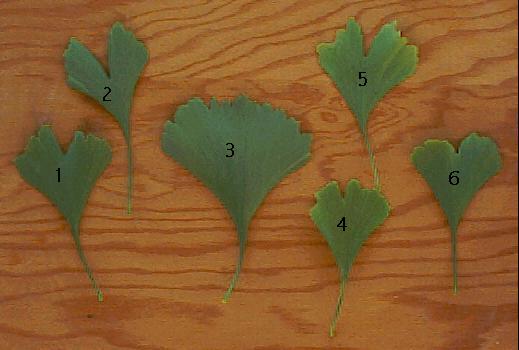
for a client's anniversary present to his wife. In the beginning I
selected a number of Ginkgo leaves from my tree, laid them out on a
board, and took a picture. I then numbered the leaves in the digital
image and e-mailed him the picture. He was able to select the
leaf he wanted put into silver by telling me what number he preferred.
The leaf chosen was #6. It made the whole project a little more fun
for the client, and for me. ![]()
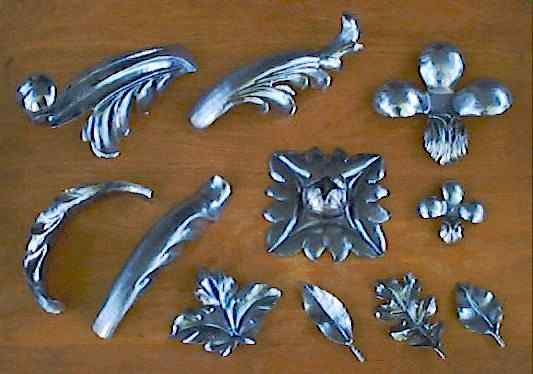
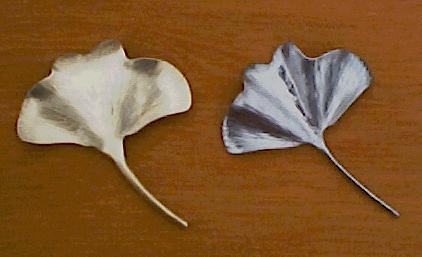
![]() Repousse'
is a very special and beautiful French metal art
form. Repousse' hammered leaves posses a very special patina that
makes them almost come alive. The steel, brass, copper, or silver,
surface has a feel that is far different from other finished metal
pieces. Repousse' is a rare art form, probably because there are very
few commercially available Repousse' tools. Virtually all hammers,
stake tools, backing blocks, etc., must be made by the artist himself.
So it is almost a necessity that the Repousse' artist first master
blacksmithing work. Most Repousse' pieces are worked on one side only,
but when making Ginkgo leaves I work both sides of the piece (See the
pendant image.), so it looks equally
finished on both sides. I do not intend to be a master Repousse'
artist, but to use Repousse' techniques in my work when it can add
special character to a piece. The stems on the Ginkgo leaves pictured
above are continuous with the body of the leave. The stem is hammer
rolled into a very tiny tube with a hole in the center not much bigger
than the hole in a hypodermic needle. The seam is almost invisible
where the rolled metal joins to form the stem tube. The hole is filled
with silver solder in the sterling silver pendants to make them one
solid piece.
Repousse'
is a very special and beautiful French metal art
form. Repousse' hammered leaves posses a very special patina that
makes them almost come alive. The steel, brass, copper, or silver,
surface has a feel that is far different from other finished metal
pieces. Repousse' is a rare art form, probably because there are very
few commercially available Repousse' tools. Virtually all hammers,
stake tools, backing blocks, etc., must be made by the artist himself.
So it is almost a necessity that the Repousse' artist first master
blacksmithing work. Most Repousse' pieces are worked on one side only,
but when making Ginkgo leaves I work both sides of the piece (See the
pendant image.), so it looks equally
finished on both sides. I do not intend to be a master Repousse'
artist, but to use Repousse' techniques in my work when it can add
special character to a piece. The stems on the Ginkgo leaves pictured
above are continuous with the body of the leave. The stem is hammer
rolled into a very tiny tube with a hole in the center not much bigger
than the hole in a hypodermic needle. The seam is almost invisible
where the rolled metal joins to form the stem tube. The hole is filled
with silver solder in the sterling silver pendants to make them one
solid piece.
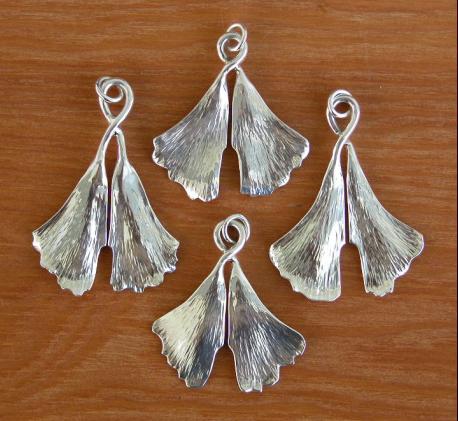
![]() There
is a very special split Ginkgo leaf design that was shown to me by
Nahum Hersom, see "Repousse' Course Work" below, that I used to
make two Repousse' Sterling silver Ginkgo pendants for my two
daughters' Christmas presents this year, 2002, and a number of others.
Unfortunately, the better I make the finish on these leaves the the
more difficult it is to get good images. Whatever, the image
below will give you an idea of the way split leaf Ginkgoes are done.
This is a spectacular design. I keep heavy gage Sterling silver on
hand, so if you want one I can probably get it shipped to you in under
a week, depending on my schedule at the time.
There
is a very special split Ginkgo leaf design that was shown to me by
Nahum Hersom, see "Repousse' Course Work" below, that I used to
make two Repousse' Sterling silver Ginkgo pendants for my two
daughters' Christmas presents this year, 2002, and a number of others.
Unfortunately, the better I make the finish on these leaves the the
more difficult it is to get good images. Whatever, the image
below will give you an idea of the way split leaf Ginkgoes are done.
This is a spectacular design. I keep heavy gage Sterling silver on
hand, so if you want one I can probably get it shipped to you in under
a week, depending on my schedule at the time.
Sterling split leaf Repousse' pendant (Click for full sized
image.)
Four Sterling Repousse' Split Ginkgo
Leaf Pendants
Two more Split Leaf Repousse' Sterling
Silver Ginkgo Pendants
Repousse' Course Work
![]() The
Repousse' pieces shown above are all "learning pieces" that I made
while attending Nahum Hersom's excellent Repousse' course in his
"Golden Pheasant Art-Metal Studio." He offers this unique course in
his shop behind his home in Boise, Idaho. Some of the above shown
pieces are only partially completed because Nahum, or "Grandpa"
as he prefers to be called, wants the student to hammer enough to
learn the technique, then move quickly on to the next technique in
order to cover everything he has scheduled in the very short six days
of the course. Nahum offers a 6 day, 8 hours a day, one on one,
course that is intensive and of exceptional quality. He not only
provides the student a solid beginning in the art of Repousse' metal
work, but also provides a large variety of additional gems of
metalworking knowledge gathered during his 84 years of living,
including some special blacksmithing techniques. The student also
becomes acquainted with Nahum's personal philosophy of life, delivered
in Nahum's easy going, humorous, manor. Walking into Nahum's shop is
like stepping back a hundred years and visiting a German blacksmith
shop. You are greeted with literally hundreds, perhaps thousands, of
tools in racks, and on benches, all of his own making, including
Repousse' shears, grinders, belt sanders, dozens of Repousse' hammers,
hundreds of stake tools, veiners, etc. Nahum has been featured in many
magazine and newspaper articles over the years, and they always
include pictures of his amazing shop. I highly recommend his
course to anyone who is interested in this exotic and beautiful
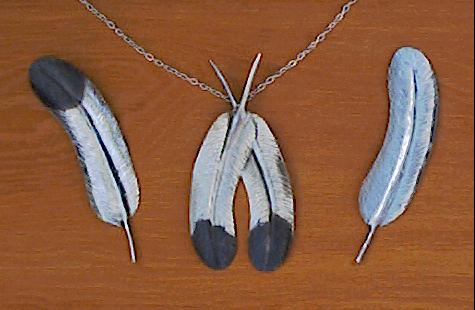
metal-art form. Although Nahum does do traditional Repousse' work on
pitch, most of his work is done "in the air" on various stake tools
held in a bench vise, such as these Eagle
feathers. The beautiful leaves, rosettes, and husks, above are
examples of this beautiful art form. Not only will the student
gain an excellent hands-on education in the art of Repousse', but he
will go home with hundreds of pages of excellent metal-working and
Repousse' reference information. I thought so highly of Nahum's course
that I had my 19 year old niece, who lives in California, come up and
take the course also. She loved it, and will use what she learned in
her arts and crafts work in California. If you are interested in
taking Nahum's course, you may contact him at (208) 345-9163. Don't
delay, his available time slots fill up early. He even has a large
park-like area of land next to his shop where a visiting student may
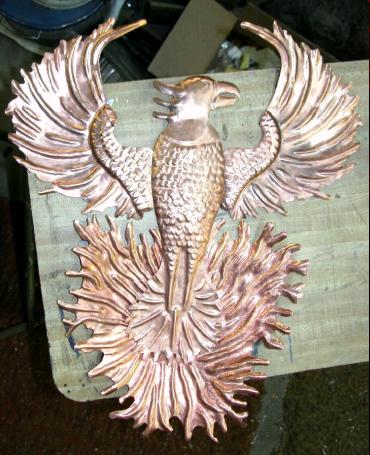
park a trailer or camper under the trees if desired. This image
of a Phoenix bird is a work-in-progress image I took while
visiting with Nahum on 14 Feb 04. It has not been temper colored yet.
It is almost 2' in height. This is an example of what can be done once
you learn the art of Repousse'.
The
Repousse' pieces shown above are all "learning pieces" that I made
while attending Nahum Hersom's excellent Repousse' course in his
"Golden Pheasant Art-Metal Studio." He offers this unique course in
his shop behind his home in Boise, Idaho. Some of the above shown
pieces are only partially completed because Nahum, or "Grandpa"
as he prefers to be called, wants the student to hammer enough to
learn the technique, then move quickly on to the next technique in
order to cover everything he has scheduled in the very short six days
of the course. Nahum offers a 6 day, 8 hours a day, one on one,
course that is intensive and of exceptional quality. He not only
provides the student a solid beginning in the art of Repousse' metal
work, but also provides a large variety of additional gems of
metalworking knowledge gathered during his 84 years of living,
including some special blacksmithing techniques. The student also
becomes acquainted with Nahum's personal philosophy of life, delivered
in Nahum's easy going, humorous, manor. Walking into Nahum's shop is
like stepping back a hundred years and visiting a German blacksmith
shop. You are greeted with literally hundreds, perhaps thousands, of
tools in racks, and on benches, all of his own making, including
Repousse' shears, grinders, belt sanders, dozens of Repousse' hammers,
hundreds of stake tools, veiners, etc. Nahum has been featured in many
magazine and newspaper articles over the years, and they always
include pictures of his amazing shop. I highly recommend his
course to anyone who is interested in this exotic and beautiful
metal-art form. Although Nahum does do traditional Repousse' work on
pitch, most of his work is done "in the air" on various stake tools
held in a bench vise, such as these Eagle
feathers. The beautiful leaves, rosettes, and husks, above are
examples of this beautiful art form. Not only will the student
gain an excellent hands-on education in the art of Repousse', but he
will go home with hundreds of pages of excellent metal-working and
Repousse' reference information. I thought so highly of Nahum's course
that I had my 19 year old niece, who lives in California, come up and
take the course also. She loved it, and will use what she learned in
her arts and crafts work in California. If you are interested in
taking Nahum's course, you may contact him at (208) 345-9163. Don't
delay, his available time slots fill up early. He even has a large
park-like area of land next to his shop where a visiting student may
park a trailer or camper under the trees if desired. This image
of a Phoenix bird is a work-in-progress image I took while
visiting with Nahum on 14 Feb 04. It has not been temper colored yet.
It is almost 2' in height. This is an example of what can be done once
you learn the art of Repousse'. ![]()
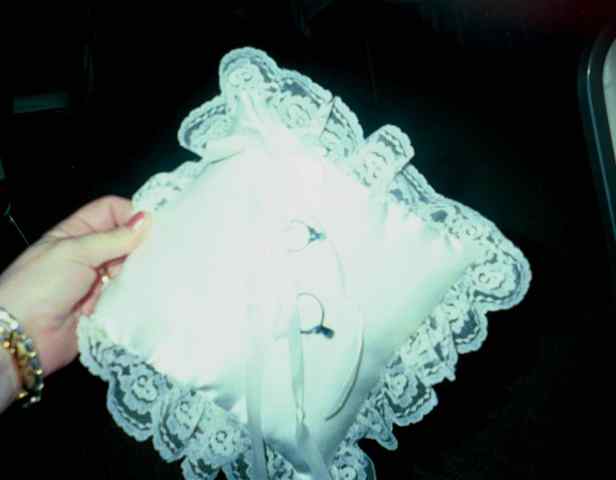
Horseshoe Nail Wedding Rings

(Click Image)
Another Ring Image
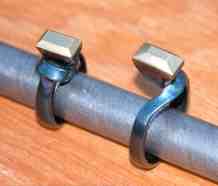
![]() I
recently had a rush-order for a wedding ring set made of horseshoe
nails. I have made many horseshoe nail rings for local kids, but these
had to be special. Also, they had to be made to specific sizes, and I
wasn't equipped for that. Being under a time deadline I immediately
ordered a ring mandrel, but it turned out they were back-ordered, so I
needed to find one locally. Fortunately a friend who used to be a
jeweler had one and and kindly loaned it to me. These
rings had to be better than the average, and after discussing it with
the buyer, I decided they needed to be really special. So the rings
you see above are the result. I left the nail maker's logo in the side
of the nail heads to prove they are actual horseshoe nails. Click the
image for a full sized view. I have an image of
the two rings on the ring pillow, but unfortunately they are out
of focus. I have included it here anyway. :-)
I
recently had a rush-order for a wedding ring set made of horseshoe
nails. I have made many horseshoe nail rings for local kids, but these
had to be special. Also, they had to be made to specific sizes, and I
wasn't equipped for that. Being under a time deadline I immediately
ordered a ring mandrel, but it turned out they were back-ordered, so I
needed to find one locally. Fortunately a friend who used to be a
jeweler had one and and kindly loaned it to me. These
rings had to be better than the average, and after discussing it with
the buyer, I decided they needed to be really special. So the rings
you see above are the result. I left the nail maker's logo in the side
of the nail heads to prove they are actual horseshoe nails. Click the
image for a full sized view. I have an image of
the two rings on the ring pillow, but unfortunately they are out
of focus. I have included it here anyway. :-)
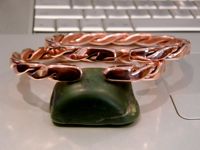
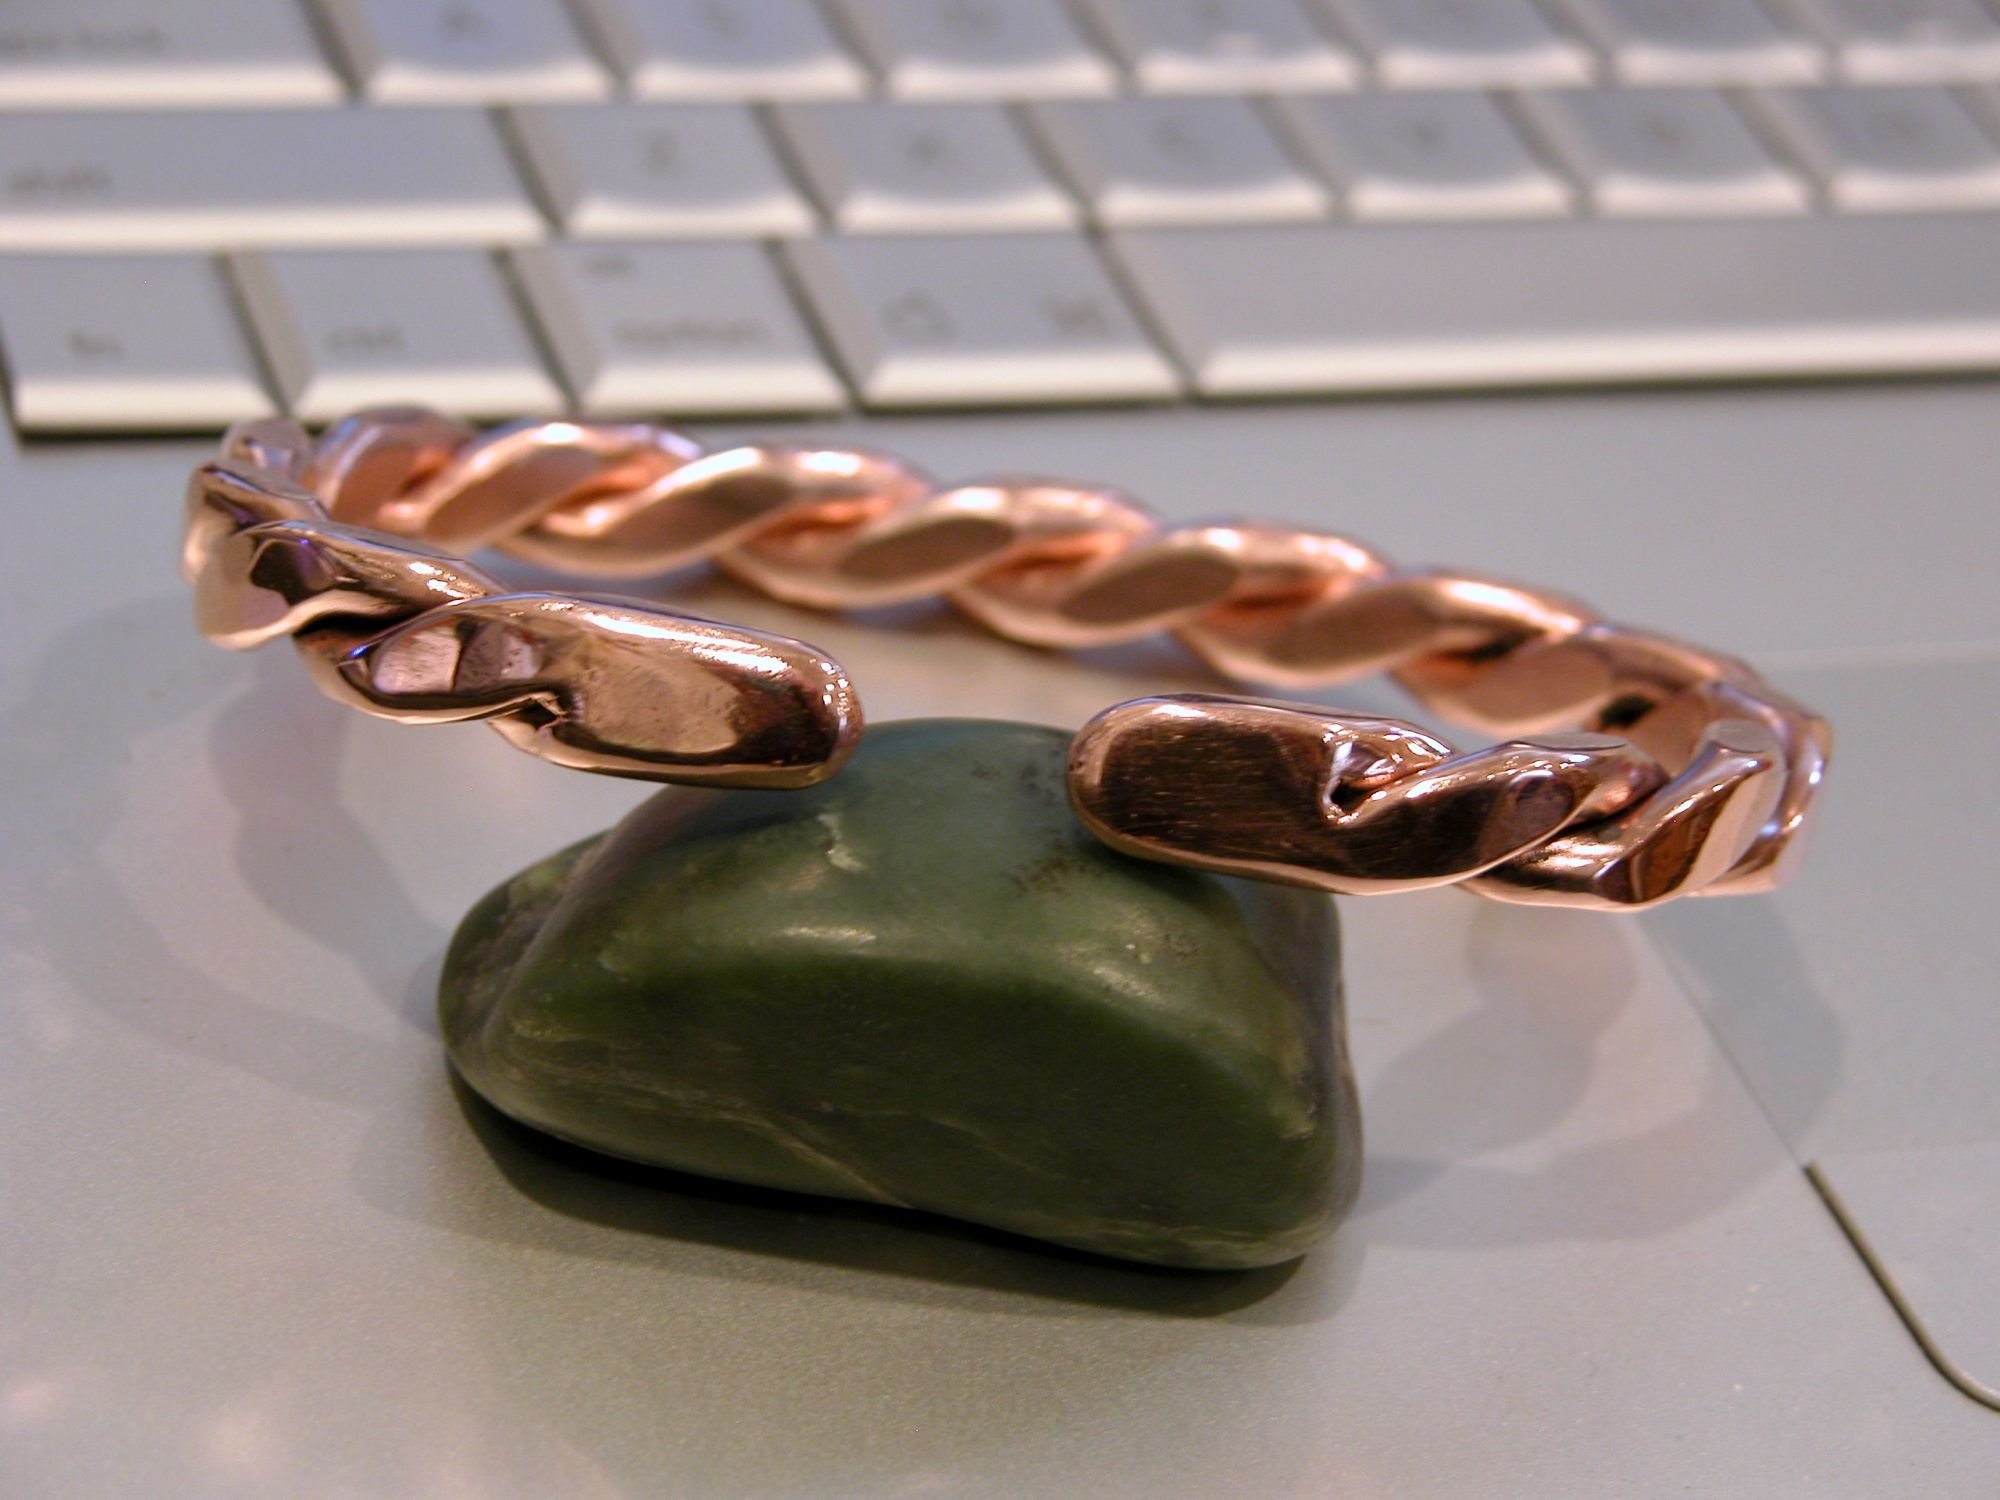
Copper Bracelets
![]() I
made two copper bracelets for a Christmas present exchange at our 2007
Garden Valley Fire Department Christmas dinner. Many of my fellow
firefighters wear my copper bracelets, and this new twisted design I
am now making is very popular, so I figured
they would be appreciated by whoever gets them. They are intended for
arthritis relief, not for use as jewelry. I have never charged the
firefighters anything for these bracelets. You don't charge your
brother for something that may help to reduce his pain and make his
life a little better. If you are interested in making one of these
bracelets, visit my instruction page for making Twisted
Wire Bracelets.
I
made two copper bracelets for a Christmas present exchange at our 2007
Garden Valley Fire Department Christmas dinner. Many of my fellow
firefighters wear my copper bracelets, and this new twisted design I
am now making is very popular, so I figured
they would be appreciated by whoever gets them. They are intended for
arthritis relief, not for use as jewelry. I have never charged the
firefighters anything for these bracelets. You don't charge your
brother for something that may help to reduce his pain and make his
life a little better. If you are interested in making one of these
bracelets, visit my instruction page for making Twisted
Wire Bracelets.
Branding
Iron
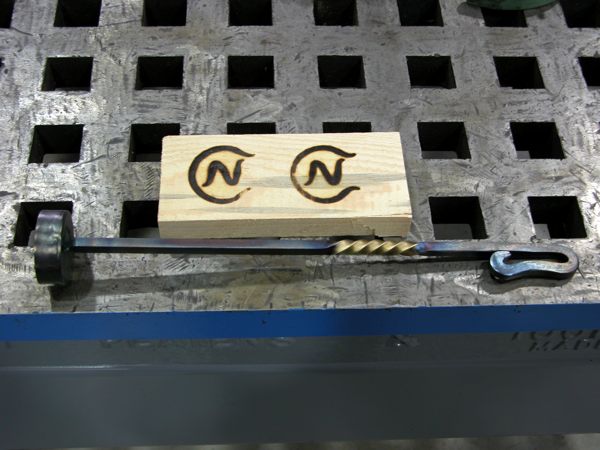
![]() The
C-N
branding iron shown above was ordered by a young couple who are
starting a horse ranch and wanted their initials, C for Christin, and
N for Nick, incorporated into their brand design. I shaped the C to
bring to mind a horseshoe, fitting I thought for a horse ranch. The
design is being registered.
The
C-N
branding iron shown above was ordered by a young couple who are
starting a horse ranch and wanted their initials, C for Christin, and
N for Nick, incorporated into their brand design. I shaped the C to
bring to mind a horseshoe, fitting I thought for a horse ranch. The
design is being registered.
Trivet Tables
(Click for full sized image.)
Trivet Table
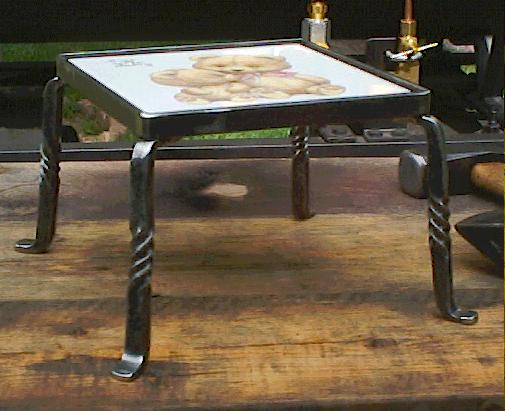
![]() These
little tables are about 4-1/2" high and 6" square. They feature a
signed decorative tile that can have any desired scene. I produced a
large number of these, see the trivet table legs
image, for a company some time ago. The one in the above image
was a gift to my younger daughter Natalie.
These
little tables are about 4-1/2" high and 6" square. They feature a
signed decorative tile that can have any desired scene. I produced a
large number of these, see the trivet table legs
image, for a company some time ago. The one in the above image
was a gift to my younger daughter Natalie.
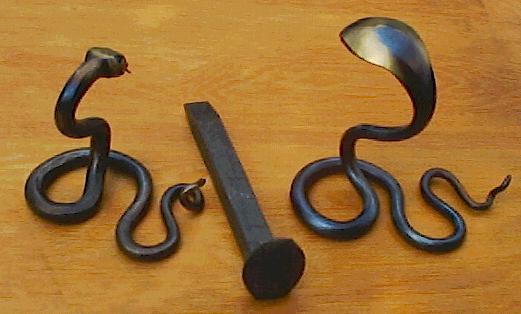
Forged Railroad Spike Snakes
Read a Customer's Comment
Railroad Spike Snakes
Back View
A Third Railroad Spike Snake With Partly
Drawn Out Spike
Two More Snakes....Front View
Back View
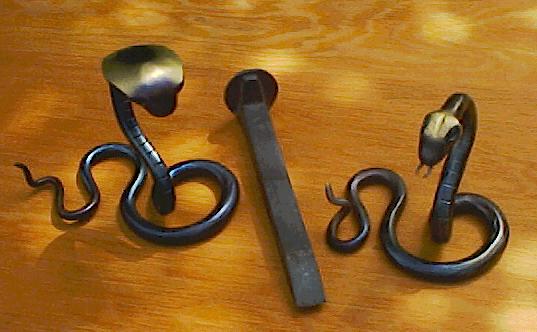
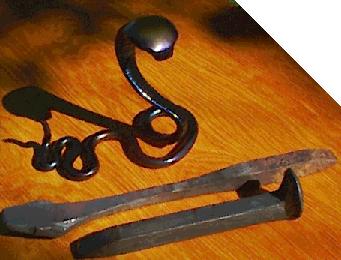
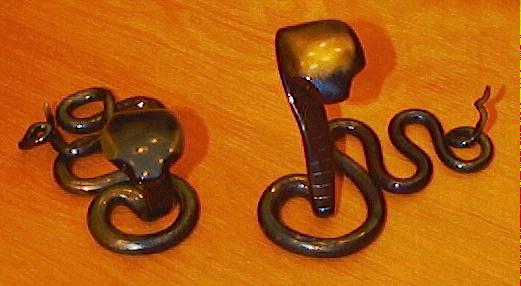
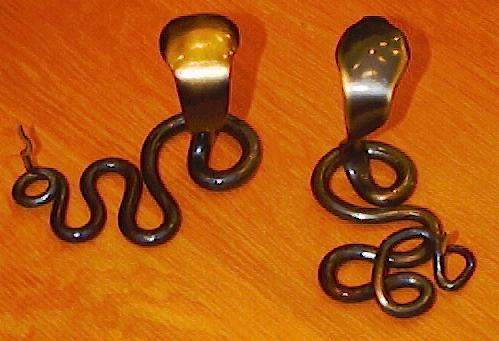
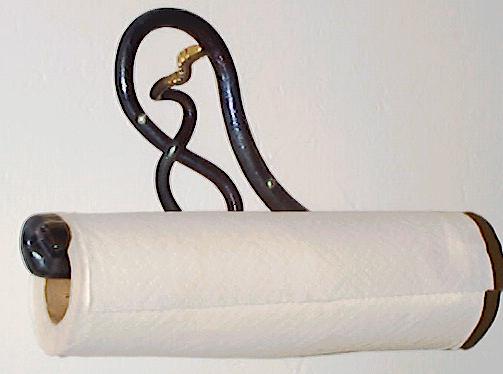
![]() These
snakes are forged from railroad spikes. The spike's head makes for
easy conversion to a snake's head, especially a Cobra. The
7" long spike is first drawn out square to a length of 24"- 28" on the
power hammer, or by the "arm-strong" method if an apprentice smith is
forging it. It is then hammer refined on the anvil to provide a
smoothly finished body and head. The tongue is forged and brazed in,
unless its a Cobra. The belly scales are chisel cut, and finally the
coils are formed. All fire scale is then removed using an acetic acid
(white vinegar) bath, and the metal polished to a bright finish on a
fine wire wheel. The final step is temper coloring and brass
highlighting. There are no paints or artificial colorings used.
Everything is metal, or metal oxides caused by heating. When all of
the metalwork is complete I apply a clear protective coating to
protect the fine finish from damage due to handing. When these little
guys are sitting on a coffee table they tend to get a lot of handling
by just about everyone who sits down nearby. :-)
These
snakes are forged from railroad spikes. The spike's head makes for
easy conversion to a snake's head, especially a Cobra. The
7" long spike is first drawn out square to a length of 24"- 28" on the
power hammer, or by the "arm-strong" method if an apprentice smith is
forging it. It is then hammer refined on the anvil to provide a
smoothly finished body and head. The tongue is forged and brazed in,
unless its a Cobra. The belly scales are chisel cut, and finally the
coils are formed. All fire scale is then removed using an acetic acid
(white vinegar) bath, and the metal polished to a bright finish on a
fine wire wheel. The final step is temper coloring and brass
highlighting. There are no paints or artificial colorings used.
Everything is metal, or metal oxides caused by heating. When all of
the metalwork is complete I apply a clear protective coating to
protect the fine finish from damage due to handing. When these little
guys are sitting on a coffee table they tend to get a lot of handling
by just about everyone who sits down nearby. :-)
Repousse' Star Clothes Hook

(Click for full sized image.)
Repousse' Star With Decorative Forged Hook
![]() This
three dimensional Repousse' star, with brazed on temper colored
backing plate, was a "requested" Christmas present (2001) for my
daughter Kimberly. The back plate has a "key-hole" hanging eye to
allow it to be hung on the wall. The back also has rubber pads mounted
on it to allow a compressed mounting against the wall to prevent any
movement when in use. The star is 6-1/2" in diameter, with an inch of
relief. The hook is 3/8" square stock with chisel cut twist. The
colors are temper colors that shade into hot applied brass
highlighting on the star points, and on the spread end of the hook.
The intended purpose is a wall mounted clothes hanging hook, and the
deep bend in the hook is to allow scarves, or other long items, to be
draped through the throat of the hook. The star is set correctly in
relation to the hook. The photo angle makes it look angled. The steel
for the star was old painted and rusted scrap 18 gage steel book shelf
metal. The Repousse' hammering removed all trace of paint and rust.
The hammering was done cold on stake tools forged from railroad
spikes, and on a lead backing block.
This
three dimensional Repousse' star, with brazed on temper colored
backing plate, was a "requested" Christmas present (2001) for my
daughter Kimberly. The back plate has a "key-hole" hanging eye to
allow it to be hung on the wall. The back also has rubber pads mounted
on it to allow a compressed mounting against the wall to prevent any
movement when in use. The star is 6-1/2" in diameter, with an inch of
relief. The hook is 3/8" square stock with chisel cut twist. The
colors are temper colors that shade into hot applied brass
highlighting on the star points, and on the spread end of the hook.
The intended purpose is a wall mounted clothes hanging hook, and the
deep bend in the hook is to allow scarves, or other long items, to be
draped through the throat of the hook. The star is set correctly in
relation to the hook. The photo angle makes it look angled. The steel
for the star was old painted and rusted scrap 18 gage steel book shelf
metal. The Repousse' hammering removed all trace of paint and rust.
The hammering was done cold on stake tools forged from railroad
spikes, and on a lead backing block.
Forged Fold-Out Cross
(Click for full sized image.)
Forged "Fold-Out" Cross
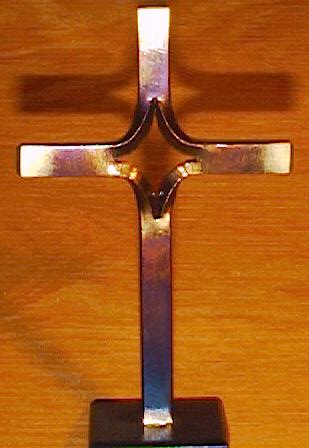
![]() I
forged this cross for my youngest daughter, Natalie, for her 2001
Christmas present. As is the case in most of my imagery, the picture
doesn't do it any favors. The colors range from an intense peacock
blue at the base, to a dark blue on the shaft, on up to a straw in the
center, and ending in the hot applied brass highlighting at the ends
of the cross. The enjoyment of making a "fold-out" cross is reward
enough to attempt this little project. This one was made out of a
single piece of 3/8" square steel bar about 5" long, and a 1-1/2" x
1-3/4" base plate. The cross is one piece, formed by folding out two
perpendicular overlapping saw cuts in the 5" long steel bar, producing
a very decorative and interesting center opening.
I
forged this cross for my youngest daughter, Natalie, for her 2001
Christmas present. As is the case in most of my imagery, the picture
doesn't do it any favors. The colors range from an intense peacock
blue at the base, to a dark blue on the shaft, on up to a straw in the
center, and ending in the hot applied brass highlighting at the ends
of the cross. The enjoyment of making a "fold-out" cross is reward
enough to attempt this little project. This one was made out of a
single piece of 3/8" square steel bar about 5" long, and a 1-1/2" x
1-3/4" base plate. The cross is one piece, formed by folding out two
perpendicular overlapping saw cuts in the 5" long steel bar, producing
a very decorative and interesting center opening.
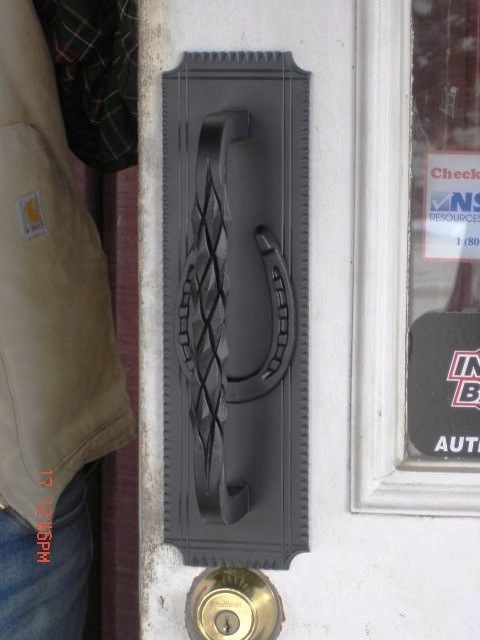
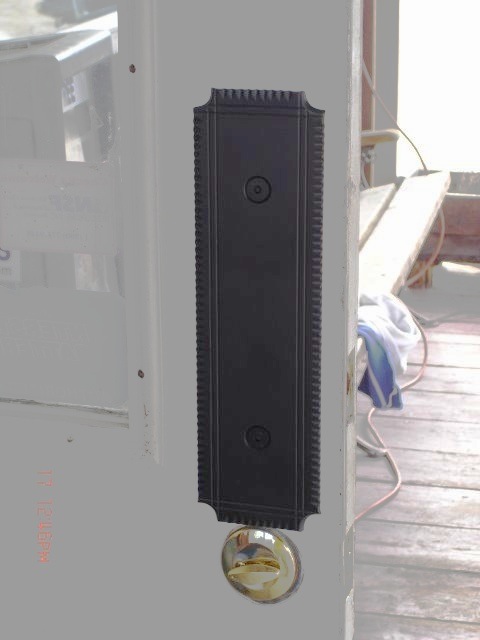
Horseshoe Door-Pull
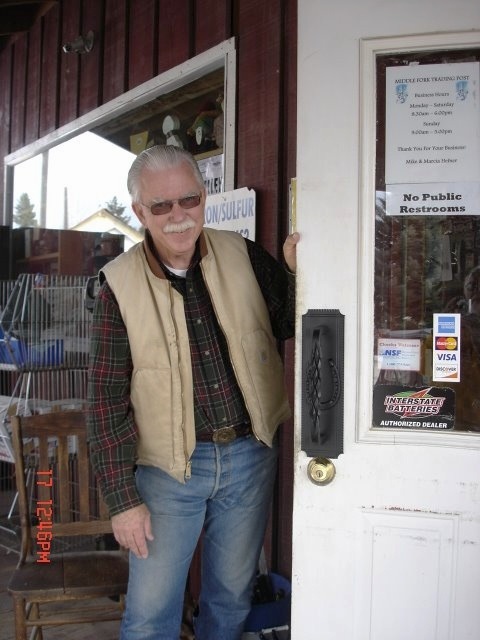
![]() I made a door-pull for the "Trading Post" here in Crouch that I
thought was nice enough to add to this page. The way it was made I
think is self evident, so I will not go into forging details. I will
just post some images here to give anyone wanting to make a first
class door-pull some ideas. BTW, the horseshoe is actually mounted
using horseshoe nails.
I made a door-pull for the "Trading Post" here in Crouch that I
thought was nice enough to add to this page. The way it was made I
think is self evident, so I will not go into forging details. I will
just post some images here to give anyone wanting to make a first
class door-pull some ideas. BTW, the horseshoe is actually mounted
using horseshoe nails.
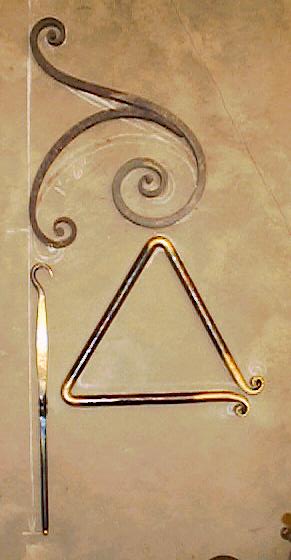
Triangle Gong, Chinese Bell, & Snub End Scroll Brackets
Dinner Gong & Chinese Bell - Click on Images
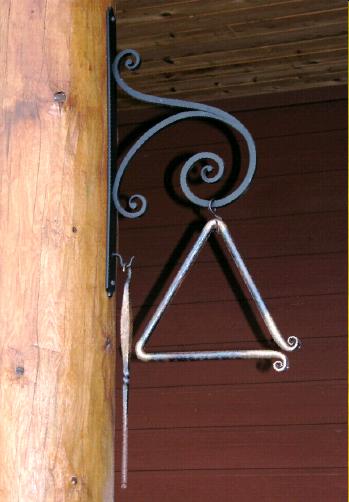
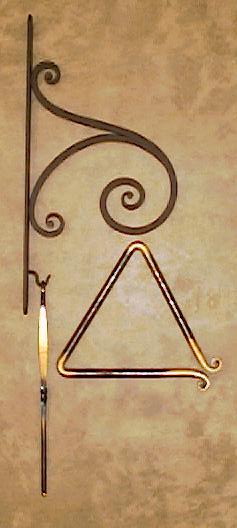
![]() Triangular
Gong: The Chinese temple bell, shown to the
right above, is covered further down the page. The triangular
dinner gong was a request 2001 Christmas present for my wife
Gretchen. She got tired of running out to the shop through the snow or
rain to get me when I was needed in the house and wanted a gong to use
to call me in with. I have also learned to "sit" and "roll over" on
command.
Triangular
Gong: The Chinese temple bell, shown to the
right above, is covered further down the page. The triangular
dinner gong was a request 2001 Christmas present for my wife
Gretchen. She got tired of running out to the shop through the snow or
rain to get me when I was needed in the house and wanted a gong to use
to call me in with. I have also learned to "sit" and "roll over" on
command.
![]() The
three snub-end scrolls were made free-form on the anvil using only
three different hand hammers, anvil, and a file. The chalk line
drawing on the shop floor, visible under the scrolls in this
preweld shop floor layout image, was used only as a very rough
guide during the forming. All forming was done hot. The scrolls are
made from 1/2" square mild steel rod. The clangor, or clapper, was
forged from a 3/4" square bar, and the power hammer was used to draw
it down to near its final shape. The scroll ended triangular gong was
forged from an old 3/4" stock diameter coil spring. The power hammer
was used to draw out the ends for the scrolls, and a bending fork held
in the vise was used for the two triangle corner bends. Using a
coil spring for source stock produces a much better tone when the gong
is struck than mild steel. The tone in this gong is very clear and
musical sounding, and will continue to ring long after it is struck. I
does need to have a leather insulator pad between the suspension hook
and the gong to prolong its ring.
The
three snub-end scrolls were made free-form on the anvil using only
three different hand hammers, anvil, and a file. The chalk line
drawing on the shop floor, visible under the scrolls in this
preweld shop floor layout image, was used only as a very rough
guide during the forming. All forming was done hot. The scrolls are
made from 1/2" square mild steel rod. The clangor, or clapper, was
forged from a 3/4" square bar, and the power hammer was used to draw
it down to near its final shape. The scroll ended triangular gong was
forged from an old 3/4" stock diameter coil spring. The power hammer
was used to draw out the ends for the scrolls, and a bending fork held
in the vise was used for the two triangle corner bends. Using a
coil spring for source stock produces a much better tone when the gong
is struck than mild steel. The tone in this gong is very clear and
musical sounding, and will continue to ring long after it is struck. I
does need to have a leather insulator pad between the suspension hook
and the gong to prolong its ring.
![]() The
two welds connecting the scrolls to the mounting plate were done as
"blind welds" from the back of the 1/4" thick mounting plate through
two holes that were 1/2" in diameter, and counter-sunk to provide
easier access for the stinger. The clapper support hook was also blind
welded into place. I considered forge-welding the scrolls together,
but did not want to risk distorting them in any way, so elected to
bevel both scroll elements where the welds would be, weld them
together with 7014 rod, and then grind and file the welds smooth and
flush with the surface of the scroll. I also welded around the end of
the short scroll, over the inside surface of the other scroll, and
ground and filed it smooth in order to obtain a smooth unbroken visual
line on the interior curve of the scroll. This worked out very well,
and the resulting lines for the outside and inside curves are smooth
and clean. Even upon close inspection there is nothing to indicate the
weld was done as an arc weld. All welds are completely invisible, as
they should be on any fine piece of ironwork. Electric welds should
never be exposed to the eye on any piece of decorative forged
ironwork. Although some purists will disagree with me, I think
electric welds are completely permissible, so long as they are covered
or hidden from view. When convenient, forge welds are preferable
however.
The
two welds connecting the scrolls to the mounting plate were done as
"blind welds" from the back of the 1/4" thick mounting plate through
two holes that were 1/2" in diameter, and counter-sunk to provide
easier access for the stinger. The clapper support hook was also blind
welded into place. I considered forge-welding the scrolls together,
but did not want to risk distorting them in any way, so elected to
bevel both scroll elements where the welds would be, weld them
together with 7014 rod, and then grind and file the welds smooth and
flush with the surface of the scroll. I also welded around the end of
the short scroll, over the inside surface of the other scroll, and
ground and filed it smooth in order to obtain a smooth unbroken visual
line on the interior curve of the scroll. This worked out very well,
and the resulting lines for the outside and inside curves are smooth
and clean. Even upon close inspection there is nothing to indicate the
weld was done as an arc weld. All welds are completely invisible, as
they should be on any fine piece of ironwork. Electric welds should
never be exposed to the eye on any piece of decorative forged
ironwork. Although some purists will disagree with me, I think
electric welds are completely permissible, so long as they are covered
or hidden from view. When convenient, forge welds are preferable
however.
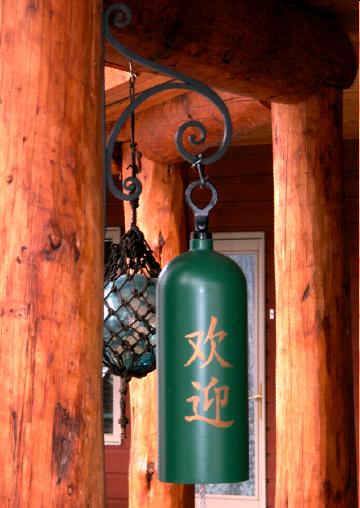
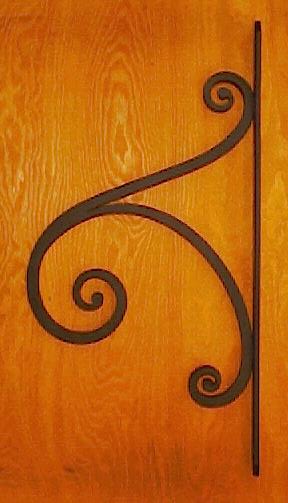
![]() Chinese
Temple Bell: I was very pleased with the results of the
triangular gong project, so I made a similar
scroll bracket to suspend my version of a "Chinese
temple bell." The bell is mounted on the house next to my back
gate for visitors to ring to get my attention when I am in the shop.
The characters on the bell say "Welcome" in Chinese. This scroll
bracket, although similar to the first one, is considerably different
in shape because it has to bear a much heavier load. I shortened its
lever-arm by moving the "hang point" inboard about two inches, and
made the large scroll smaller in diameter, or tighter. I also moved
the hang point up several inches higher in relation to the bottom
scroll. This can be plainly seen by comparing the two images at the
top of this section. The bolt plate has three mounting bolt holes
instead of two. I also enlarged the upper "blind" welding hole in the
bolt plate from a 1/2" drilled and countersunk hole, to a 1/2" x
3/4" rectangular hole for more weld strength. It is still completely
invisible, even from the back. I like this second bracket better than
the first because the scrolls seem to "flow" better, and have better
symmetry to my eye. :-)
Chinese
Temple Bell: I was very pleased with the results of the
triangular gong project, so I made a similar
scroll bracket to suspend my version of a "Chinese
temple bell." The bell is mounted on the house next to my back
gate for visitors to ring to get my attention when I am in the shop.
The characters on the bell say "Welcome" in Chinese. This scroll
bracket, although similar to the first one, is considerably different
in shape because it has to bear a much heavier load. I shortened its
lever-arm by moving the "hang point" inboard about two inches, and
made the large scroll smaller in diameter, or tighter. I also moved
the hang point up several inches higher in relation to the bottom
scroll. This can be plainly seen by comparing the two images at the
top of this section. The bolt plate has three mounting bolt holes
instead of two. I also enlarged the upper "blind" welding hole in the
bolt plate from a 1/2" drilled and countersunk hole, to a 1/2" x
3/4" rectangular hole for more weld strength. It is still completely
invisible, even from the back. I like this second bracket better than
the first because the scrolls seem to "flow" better, and have better
symmetry to my eye. :-)
![]() The
eye fitting in the top of the tank section was forged from 1" diameter
wrought iron bar. I used wrought iron only because I have a lot of it,
and like to use wrought iron for items that will be for me or my
family. I consider wrought iron a cut above mild steel for use in some
of my projects. This particular wrought iron bar is very high quality,
probably quad refined, so it was like working butter, and made making
the complicated fitting easier. The slag strands are visible in the
cut end of the bar only with magnification. The neck of the eye is
forged to act as a plug to just fill the threaded neck of the tank,
and then further necks down to a 5/8" square section rod that sticks
down about 4" into the bell. It ends in a thinned portion that has a
hole in it to accept the link for attachment of the bell clapper.
After I welded the eye fitting to the top of the tank, using 7014 rod,
I ground and filed the weld until it was completely smooth, and looked
no different than the rest of the machined surfaces on the neck of the
tank, other than its at a different angle. The result is very smooth
and pleasing to the eye. There is nothing to give it away that this
started out as a hydro test failed CO2 bottle.
:-)
The
eye fitting in the top of the tank section was forged from 1" diameter
wrought iron bar. I used wrought iron only because I have a lot of it,
and like to use wrought iron for items that will be for me or my
family. I consider wrought iron a cut above mild steel for use in some
of my projects. This particular wrought iron bar is very high quality,
probably quad refined, so it was like working butter, and made making
the complicated fitting easier. The slag strands are visible in the
cut end of the bar only with magnification. The neck of the eye is
forged to act as a plug to just fill the threaded neck of the tank,
and then further necks down to a 5/8" square section rod that sticks
down about 4" into the bell. It ends in a thinned portion that has a
hole in it to accept the link for attachment of the bell clapper.
After I welded the eye fitting to the top of the tank, using 7014 rod,
I ground and filed the weld until it was completely smooth, and looked
no different than the rest of the machined surfaces on the neck of the
tank, other than its at a different angle. The result is very smooth
and pleasing to the eye. There is nothing to give it away that this
started out as a hydro test failed CO2 bottle.
:-)
![]() I
made the clapper by fagot-welding six 3/8" x 1" long round steel
bar sections around the circumference of a 3/8" bar, and on top of
them six more 3/8" x 3/4" segments, with 1/4" x 3/4" segments
between each of them, for a total of 18 segments. I cheated, as I
tacked the ends of the bar segments together on the shaft with the arc
welder prior to forge welding them into one solid mass of steel. After
fagot-welding them into one piece, I rounded the resulting cylindrical
steel mass into a smooth ball shape on the swage block. I had to be
careful not to damage the 3/8" shaft that sticks through both sides of
the ball. This was all very time consuming. If I do it again I will
use a short piece of round steel bar, say about 1-1/4" in diameter and
1-1/4" long, which I will center drill to fit the 3/8" clapper shaft,
then place the 3/8" shaft in it and forge weld it solid, or perhaps
just arc weld each end solidly to the shaft. I will then round it up
on the swage block. I recommend making the striking ball of your
clapper, within reason, as heavy as possible, as the weight of the
clapper has a direct relation to what harmonic frequencies are created
in the vibrating bell. Light weight clappers will bring out only the
higher tones, while a heavier clapper will bring out the deeper more
desirable tones. Also, it is much more satisfying to pull the heavy
clapper against the side of the bell, instead of having to "whip" a
light weight one against the bell.
I
made the clapper by fagot-welding six 3/8" x 1" long round steel
bar sections around the circumference of a 3/8" bar, and on top of
them six more 3/8" x 3/4" segments, with 1/4" x 3/4" segments
between each of them, for a total of 18 segments. I cheated, as I
tacked the ends of the bar segments together on the shaft with the arc
welder prior to forge welding them into one solid mass of steel. After
fagot-welding them into one piece, I rounded the resulting cylindrical
steel mass into a smooth ball shape on the swage block. I had to be
careful not to damage the 3/8" shaft that sticks through both sides of
the ball. This was all very time consuming. If I do it again I will
use a short piece of round steel bar, say about 1-1/4" in diameter and
1-1/4" long, which I will center drill to fit the 3/8" clapper shaft,
then place the 3/8" shaft in it and forge weld it solid, or perhaps
just arc weld each end solidly to the shaft. I will then round it up
on the swage block. I recommend making the striking ball of your
clapper, within reason, as heavy as possible, as the weight of the
clapper has a direct relation to what harmonic frequencies are created
in the vibrating bell. Light weight clappers will bring out only the
higher tones, while a heavier clapper will bring out the deeper more
desirable tones. Also, it is much more satisfying to pull the heavy
clapper against the side of the bell, instead of having to "whip" a
light weight one against the bell.
![]() If
you want to see just what kind of tones your bell is capable of
producing before you paint it, hit the outside with a 2x4 while
holding it up by the neck. That will bring forth the deepest and best
tones the bell is capable of producing. It was very impressive in my
bell, and scared my poor dog Cooper rather badly. She has a very low
opinion of the bell now. Quality of workmanship has no bearing on her
opinions in such matters, so send your pooch into the house before you
conduct this test. BTW, I do not know what kind of steel a pressure
cylinder is made of, but its not mild steel, so a bell made from a
pressure cylinder will produce a fairly high quality tone when its
struck. I did notice a minor deadening of the tone when I painted the
bell. I am hoping that as the still soft paint cures and hardens in
the sun this summer it will regain the small amount of lost tone. Even
considering the loss of tone, it still has a very pleasing and very loud
sound, and gets my attention in the shop easily, unless I am working
with a very noisy tool. Update: My dog Cooper has changed her
opinion of the bell and is now trying to ring it herself. The lower
end of clapper cord is at the extreme limit of her reach, so she has
not been successful so far. :-)
If
you want to see just what kind of tones your bell is capable of
producing before you paint it, hit the outside with a 2x4 while
holding it up by the neck. That will bring forth the deepest and best
tones the bell is capable of producing. It was very impressive in my
bell, and scared my poor dog Cooper rather badly. She has a very low
opinion of the bell now. Quality of workmanship has no bearing on her
opinions in such matters, so send your pooch into the house before you
conduct this test. BTW, I do not know what kind of steel a pressure
cylinder is made of, but its not mild steel, so a bell made from a
pressure cylinder will produce a fairly high quality tone when its
struck. I did notice a minor deadening of the tone when I painted the
bell. I am hoping that as the still soft paint cures and hardens in
the sun this summer it will regain the small amount of lost tone. Even
considering the loss of tone, it still has a very pleasing and very loud
sound, and gets my attention in the shop easily, unless I am working
with a very noisy tool. Update: My dog Cooper has changed her
opinion of the bell and is now trying to ring it herself. The lower
end of clapper cord is at the extreme limit of her reach, so she has
not been successful so far. :-)
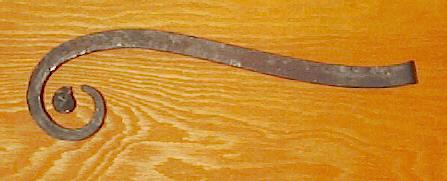
![]() If
you are reading this page because you are looking for ideas for doing
your own metal-work, a word or two about scroll "failures" may be in
order. The learning curve for making scrolls is very steep. The first
one will be quite difficult, but the next will be much easier
and faster. Scroll work, at least free-form scroll work, is 100% in
the eye and hand. If you use jigs or forms, then you can easily enough
produce well formed scrolls, but so can machines. Of course, if a
number of identical scroll elements need to be made, there is no other
alternative to using a jig to make them. Free-form scroll work is
much more difficult, but also much more satisfying. It takes many
tweaking heats for me to get the shape exactly as I want it. Also,
things don't always go as desired. This picture
is of a snub end scroll element that went badly. The lesson to be
learned from this picture is to ensure you do not make the neck of the
scroll too thin or it may break off, as it did here. I suggest that
perhaps 1/8" is a minimum neck thickness for your snub ended scrolls,
and 3/16" would be even better. All was not lost with the scroll
element in this picture however. It was one end of a double reversed
scroll element, so I cut off this bad portion and was able to use the
other end for a single ended scroll element. It became the lower
smaller scroll that is blind welded to the bolt plate in the scroll
bracket for the triangular dinner gong discussed above.
If
you are reading this page because you are looking for ideas for doing
your own metal-work, a word or two about scroll "failures" may be in
order. The learning curve for making scrolls is very steep. The first
one will be quite difficult, but the next will be much easier
and faster. Scroll work, at least free-form scroll work, is 100% in
the eye and hand. If you use jigs or forms, then you can easily enough
produce well formed scrolls, but so can machines. Of course, if a
number of identical scroll elements need to be made, there is no other
alternative to using a jig to make them. Free-form scroll work is
much more difficult, but also much more satisfying. It takes many
tweaking heats for me to get the shape exactly as I want it. Also,
things don't always go as desired. This picture
is of a snub end scroll element that went badly. The lesson to be
learned from this picture is to ensure you do not make the neck of the
scroll too thin or it may break off, as it did here. I suggest that
perhaps 1/8" is a minimum neck thickness for your snub ended scrolls,
and 3/16" would be even better. All was not lost with the scroll
element in this picture however. It was one end of a double reversed
scroll element, so I cut off this bad portion and was able to use the
other end for a single ended scroll element. It became the lower
smaller scroll that is blind welded to the bolt plate in the scroll
bracket for the triangular dinner gong discussed above.
Misc Items
Rattlesnake Paper Towel Holder
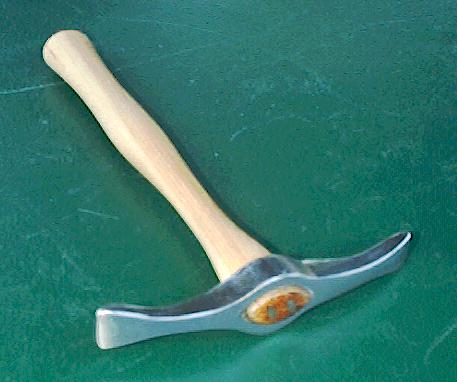
Repousse'
Hammer
(This hammer is my favorite Repousse' hammer, and the one I used to make
the various Ginkgo leaves shown above.)
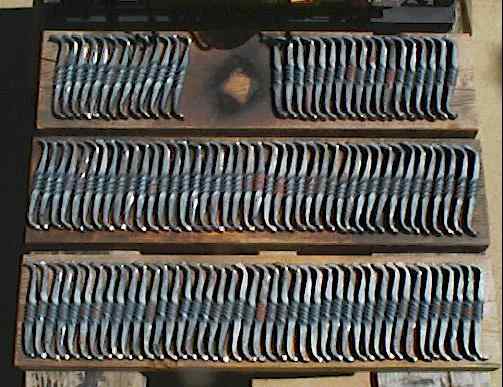
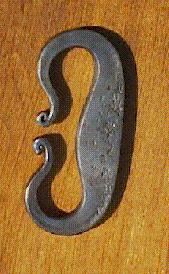
Flint and Steel "File Steel" Strikers
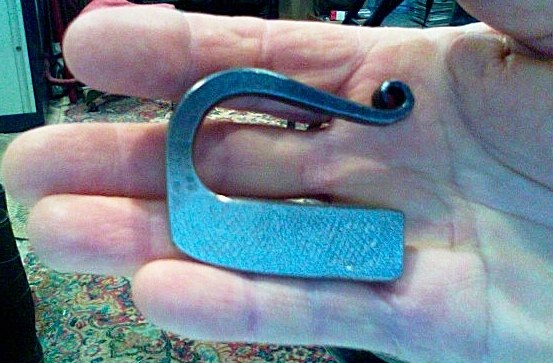
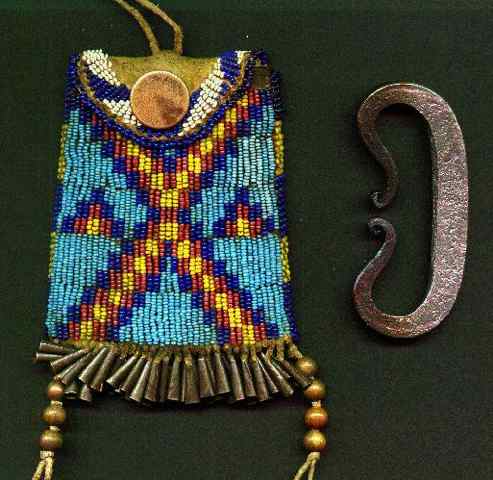
![]() The
following
image is of a circa 1880's mini fire striker that I made from a
pattern I traced of an orriginal unused striker that was in a museum
display case. Like all of my file steel strikers, it is made from a
very old file to make sure it is plain high carbon steel and not a
modern alloy, and the temper has been hardened and drawn to develop
the maximum spray of sparks when it is struck. Strikers made from old
files and tempered properly are FAR superior to those made from the
much lower carbon 1095 steel that most strikers are made from. The
handle temper was further drawn while the rest of the striker was
submerged in water, so that it has a softer spring temper to prevent
breakage if dropped on a hard surface. Further, I used an ultra
powerful rare earth magnet to magnetize it so that if the striker is
hung on a thread from the eye in its handle, the left end will rotate
and point north. So this striker can both start your fire and guide
you out of the wilderness. I like multipurpose tools.
The
following
image is of a circa 1880's mini fire striker that I made from a
pattern I traced of an orriginal unused striker that was in a museum
display case. Like all of my file steel strikers, it is made from a
very old file to make sure it is plain high carbon steel and not a
modern alloy, and the temper has been hardened and drawn to develop
the maximum spray of sparks when it is struck. Strikers made from old
files and tempered properly are FAR superior to those made from the
much lower carbon 1095 steel that most strikers are made from. The
handle temper was further drawn while the rest of the striker was
submerged in water, so that it has a softer spring temper to prevent
breakage if dropped on a hard surface. Further, I used an ultra
powerful rare earth magnet to magnetize it so that if the striker is
hung on a thread from the eye in its handle, the left end will rotate
and point north. So this striker can both start your fire and guide
you out of the wilderness. I like multipurpose tools.
Museum Replica for an
Original "Strike-A-Light" Pouch
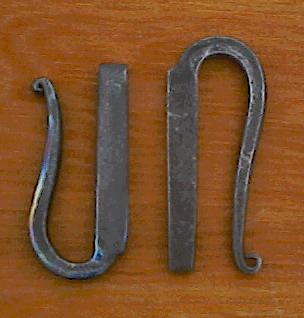
Single Striker from Old File, (I use this one)
Titanium Striker on Left, File Steel on Right
C-striker Shipped to
Thailand
U-striker Shipped to Thailand
Customer comments on above two
strikers
![]() Notes
on Strikers: I recommend use of old hay-rake tine steel if
you need to make a number of strikers, say
30-40 at a time. Hay rake tine steel does not have as much carbon, 95
points, as file steel, 120 points, therefore will not throw quite as
good a spray of sparks, but it is much easier to forge, and will
function fairly well in making fires if properly tempered. Temper them
in warm quenching oil, not water. I preheat one gallon of quenching
oil by submerging a red hot railroad spike in it prior to using it for
hardening strikers. I am able to forge one striker every 20 minutes,
and the oil will maintain its temperature at that rate of
production. I do not draw the temper of the striking surface on
1095 steel strikers, but do soften the horns to prevent breakage if it
is dropped on a hard surface. Also, be sure to grind off the
decarborized steel on the striking surface to obtain the best shower
of sparks when in use. I also use a special jig to bend the double
tapered striker blanks around to form identical and symmetrical horns.
This greatly speeds up the forging process when making large numbers
of these strikers.
Notes
on Strikers: I recommend use of old hay-rake tine steel if
you need to make a number of strikers, say
30-40 at a time. Hay rake tine steel does not have as much carbon, 95
points, as file steel, 120 points, therefore will not throw quite as
good a spray of sparks, but it is much easier to forge, and will
function fairly well in making fires if properly tempered. Temper them
in warm quenching oil, not water. I preheat one gallon of quenching
oil by submerging a red hot railroad spike in it prior to using it for
hardening strikers. I am able to forge one striker every 20 minutes,
and the oil will maintain its temperature at that rate of
production. I do not draw the temper of the striking surface on
1095 steel strikers, but do soften the horns to prevent breakage if it
is dropped on a hard surface. Also, be sure to grind off the
decarborized steel on the striking surface to obtain the best shower
of sparks when in use. I also use a special jig to bend the double
tapered striker blanks around to form identical and symmetrical horns.
This greatly speeds up the forging process when making large numbers
of these strikers.
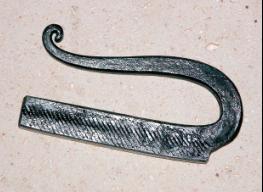
A Group of Eight Hay Rake Tine Strikers
![]() When I use 3/8" hay rake tine steel, I first hot cut it into 3"
lengths, square it up on the anvil, then taper each end, which will be
later bent to form the horns of the striker. I also bevel each corner
of the squared up steel section to provide the finished striker a
smooth soft feel in the hands. Leaving sharp edges on a striker is a
sign of sloppy work, and in my opinion there is no excuse for such
slip-shod workmanship when its so easy to do it right. I use a special
quenching oil sold by "Brownells" that has special additives which
remove almost all the fire scale, leaving a clean bright gray metal
surface on the striker. This makes producing a high quality striker
very easy, and relatively fast to do.
When I use 3/8" hay rake tine steel, I first hot cut it into 3"
lengths, square it up on the anvil, then taper each end, which will be
later bent to form the horns of the striker. I also bevel each corner
of the squared up steel section to provide the finished striker a
smooth soft feel in the hands. Leaving sharp edges on a striker is a
sign of sloppy work, and in my opinion there is no excuse for such
slip-shod workmanship when its so easy to do it right. I use a special
quenching oil sold by "Brownells" that has special additives which
remove almost all the fire scale, leaving a clean bright gray metal
surface on the striker. This makes producing a high quality striker
very easy, and relatively fast to do.
![]() Counting the cleaning, grinding off the decarborized surface, and
drawing the temper on the horns, I have about 30 minutes invested in
each finished striker. I can't compete with the $3 price that the
slip-shod "artists" ask for their sharp cornered, fire scaled junk.
But if a customer is offered a side by side comparison between my
strikers, and the junk strikers, they will almost always choose one of
mine at four times the cost, especially if they try drawing sparks
from each one.
Counting the cleaning, grinding off the decarborized surface, and
drawing the temper on the horns, I have about 30 minutes invested in
each finished striker. I can't compete with the $3 price that the
slip-shod "artists" ask for their sharp cornered, fire scaled junk.
But if a customer is offered a side by side comparison between my
strikers, and the junk strikers, they will almost always choose one of
mine at four times the cost, especially if they try drawing sparks
from each one.
![]() Quality
of Strikers: I have a copy of a video a friend
of mine made at a recent SCA gathering that shows a woman using a very
poor quality striker attempting to "strike-a-light" to ignite a hand
made river-clay iron smelting furnace. She spends 10-15 minutes
hammering her striker against the edge of her flint before she is
finally able to catch a spark on her char-cloth. Using a good quality
striker, good char-cloth, a sharp flint, and good tinder, you
should be able to strike-a-light reliably in 10-20 seconds every time.
If you are making strikers for commercial sale, you owe it to your
customers to provide them with the best possible tool for their money.
It is tempting to short-cut the work, and expend minimal time and
effort, but you do not do your customer, yourself, or the smithing
community, justice by doing so. Do it right, charge accordingly, and
everyone benefits. :-)
Quality
of Strikers: I have a copy of a video a friend
of mine made at a recent SCA gathering that shows a woman using a very
poor quality striker attempting to "strike-a-light" to ignite a hand
made river-clay iron smelting furnace. She spends 10-15 minutes
hammering her striker against the edge of her flint before she is
finally able to catch a spark on her char-cloth. Using a good quality
striker, good char-cloth, a sharp flint, and good tinder, you
should be able to strike-a-light reliably in 10-20 seconds every time.
If you are making strikers for commercial sale, you owe it to your
customers to provide them with the best possible tool for their money.
It is tempting to short-cut the work, and expend minimal time and
effort, but you do not do your customer, yourself, or the smithing
community, justice by doing so. Do it right, charge accordingly, and
everyone benefits. :-)
The Full Site Map - Lists All Pages on This Site
Return to The Forge and Foundry Page
Return to The Forge and
Burner Design Page
Visit
my Quarter Horse Ranch Page
Page By: Ron Reil
©Golden Age Forge
20 Mar 2012